#Devops Day19
Hello , Everyone, This is my 19 blog started my day19 as AWS DevOps Engineer #90daysofchallenge with ShubhamLondhe #devops #trainwithshubham.
Docker-Volume
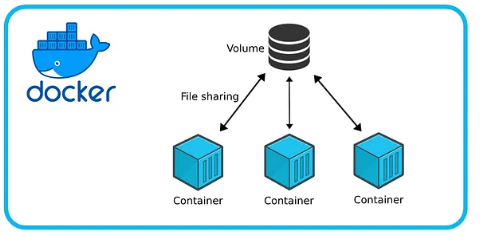
Docker allows you to create something called volumes. Volumes are like separate storage areas that can be accessed by containers. They allow you to store data, like a database, outside the container, so it doesn't get deleted when the container is deleted. You can also mount from the same volume and create more containers having same data.
Volumes are the preferred mechanism for persisting data generated by and used by Docker containers. While bind mounts are dependent on the directory structure and OS of the host machine, volumes are completely managed by Docker. Volumes have several advantages over bind mounts:
Volumes are easier to back up or migrate than bind mounts.
You can manage volumes using Docker CLI commands or the Docker API.
Volumes work on both Linux and Windows containers.
Volumes can be more safely shared among multiple containers.
Volume drivers let you store volumes on remote hosts or cloud providers, encrypt the contents of volumes, or add other functionality.
New volumes can have their content pre-populated by a container.
Volumes on Docker Desktop have much higher performance than bind mounts from Mac and Windows hosts.
Choose the -v or --mount flag
In general, --mount is more explicit and verbose. The biggest difference is that the -v syntax combines all the options together in one field, while the --mount syntax separates them. Here is a comparison of the syntax for each flag.
If you need to specify volume driver options, you must use --mount.
-vor--volume: Consists of three fields, separated by colon characters (:). The fields must be in the correct order, and the meaning of each field isn't immediately obvious.In the case of named volumes, the first field is the name of the volume, and is unique on a given host machine. For anonymous volumes, the first field is omitted.
The second field is the path where the file or directory are mounted in the container.
The third field is optional, and is a comma-separated list of options, such as
ro. These options are discussed below.
--mount: Consists of multiple key-value pairs, separated by commas and each consisting of a<key>=<value>tuple. The--mountsyntax is more verbose than-vor--volume, but the order of the keys isn't significant, and the value of the flag is easier to understand.The
typeof the mount, which can bebind,volume, ortmpfs. This topic discusses volumes, so the type is alwaysvolume.The
sourceof the mount. For named volumes, this is the name of the volume. For anonymous volumes, this field is omitted. Can be specified assourceorsrc.The
destinationtakes as its value the path where the file or directory is mounted in the container. Can be specified asdestination,dst, ortarget.The
readonlyoption, if present, causes the bind mount to be mounted into the container as read-only. Can be specified asreadonlyorro.The
volume-optoption, which can be specified more than once, takes a key-value pair consisting of the option name and its value.
Docker Network
Docker allows you to create virtual spaces called networks, where you can connect multiple containers (small packages that hold all the necessary files for a specific application to run) together. This way, the containers can communicate with each other and with the host machine (the computer on which the Docker is installed). When we run a container, it has its own storage space that is only accessible by that specific container. If we want to share that storage space with other containers, we can't do that.
create a network usin the cmnd : docker network create <network_name>
• connect containers to the network usin the --network flag: docker run --network <network_name> <image_name>
• this enables communication between containers n the host machine.
• containers within the same network can communicate w each other.
Task-1
- Create a multi-container docker-compose file which will bring UP and bring DOWN containers in a single shot ( Example - Create application and database container )
Ans:- start a multi-container application in detached mode: docker-compose up -d
• adjust the number of replicas for a specific service: docker-compose scale <service_name>=<replica_count>
• view the status of all containers: docker-compose ps
• view the logs of a specific service: docker-compose logs <service_name>
• stop n remove all containers, networks, and volumes associated w the application : docker-compose down.
Task-2
Learn how to use Docker Volumes and Named Volumes to share files and directories between multiple containers.
Create two or more containers that read and write data to the same volume using the
docker run --mountcommand.Verify that the data is the same in all containers by using the docker exec command to run commands inside each container.
Use the docker volume ls command to list all volumes and docker volume rm command to remove the volume when you're done.
Ans:- To share files n directories between multiple containers usin docker volumes n named volumes : follow these steps :
• create a named volume : docker volume create <volume_name>
• run containers that read n write data to the same volume : docker run -v <volume_name>:<container_path> <image_name>
• verify data consistency across containers : docker exec <container_name> <command>
• list all volumes : docker volume ls
• remove the volume : docker volume rm <volume_name>